draw h tree using recursion
Note: This lab should be done in partners.
Note: This lab is adapted from the Beauty and Joy of Computing (BJC) curriculum.
Goals
- Learn how to manipulate the coordinate system using
translate()androtate(). - Understand the techniques to solving problem recursively.
- Imagine how the computer follows the instructions in a recursive program.
Recursive Tree
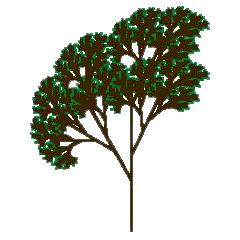
Our goal is to draw a tree that looks something like this:
But for the sake of simplicity and to better illustrate the recursion, we'll start with a simpler version like the one shown below on the left. The key to understanding this technique is to notice the tree is a fractal , that is, a picture that contains smaller versions of itself (see the red and blue trees shown below on the right).
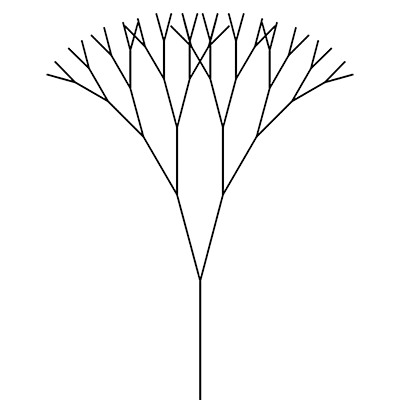
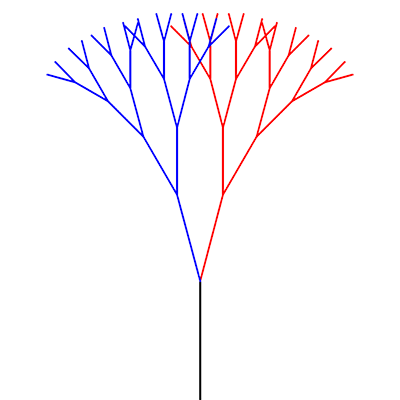
We're going to create a function tree() to draw our tree. It will first draw the trunk of the tree, rotate slightly, call tree() to draw the right branch, rotate again, and then call tree() to draw the left branch.
We will build up to the overall tree starting with simpler steps.
Step 0: Manipulating the Coordinate Grid
Take some time to read parts of this tutorial on 2D Transformations in Processing. Focus on "Translation: Moving the Grid" and "Rotation" sections. You do not need to understand or use pushMatrix and popMatrix for this lab.
Set up a basic program in Processing with a drawing canvas size of your choice. Start with the following draw() function:
void draw() { translate(width/2,height); // move origin rotate(radians(0)); // rotate (degrees) // try drawing something to see where it shows up! noLoop(); // only draw once } The call to translate() above will move the origin of your coordinate system to the middle of the bottom edge of your drawing canvas regardless of the size of your canvas!
Play around with the code above to make sure that you understand the effects of the translate() and rotate() functions:
- Insert some drawing statements to see where things now show up on your canvas.
- If the canvas looks blank, you may be drawing off the bottom.
- Change the 0 in the
rotate()function to see how it alters your drawing.- Rotations occur in the clockwise direction around the origin.
- Make sure to try both positive and negative numbers between -360 and +360.
Step 1: Explicit Trees
Copy the functions tree1() and tree2x() below into your program. These both explicitly draw out small trees -- tree1() is just a trunk and tree2x() has a trunk and two branches.
void tree1(float len) { line(0,0,0,-len); // draw trunk } void tree2x(float len) { line(0,0,0,-len); // draw trunk translate(0,-len); // move origin to top of trunk rotate(radians(15)); // rotate slightly to right line(0,0,0,-len*0.75); // draw right branch rotate(radians(-30)); // rotate back to the left (twice as much as before) line(0,0,0,-len*0.75); // draw left branch rotate(radians(15)); // rotate back to "normal" translate(0,len); // move origin back to bottom of trunk } Notice that tree2x() is deliberately symmetric with calls to rotate() and translate() -- returning the coordinate system to where you started is a key part to making this work properly.
Try calling tree1() and/or tree2x() from draw() and make sure the output matches your expectations. We encourage you to play with the non-zero values in tree2x() to increase your understanding of the effect of each instruction.
At this rate, it'll take you forever to make the beautiful version of the tree! Let's see if we can simplify this process.
Step 2: Building Up Trees
Make a copy of the tree2x() function and rename it tree2(). Notice any similarities with tree1()? Replace the code to draw the branches in tree2() with calls to tree1().
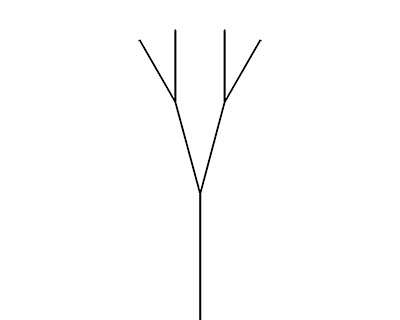
Now make a tree3() function that works the same way but calls tree2() to draw the branches. The output should look something like the following:
Step 3: Making It Recursive
These blocks all look exactly the same, don't they? So it makes sense to wonder if we can replace them all with a single tree() function. Here's the big idea: we can write a tree() function that calls itself, provided that it knows how many levels it's expected to draw! So it will need a levels input in addition to the length (len) input.
In the previous Step, tree3() used tree2() and tree2() used tree1(). If you actually had the patience to work up to tree120(), what function would it call for its two branches? To generalize the pattern, tree() will call tree(), but reduce levels by 1:
void tree(float len, int levels) { // what code should go in here? // make sure that it calls tree() to make the branches } It should look similar to the other tree functions you have written up to this point. Try reproducing the tree3 image using tree().
Unfortunately, it does not work! You should get something that looks like the image below. Note: your drawing canvas window will likely get very laggy and Processing may throw you an interesting error message.
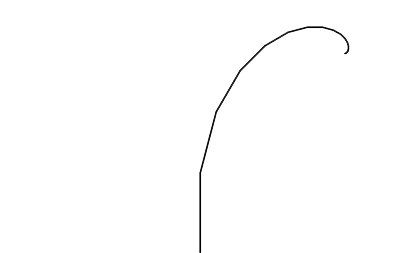
Discuss with your partner: what's wrong with the function? It may help to trace the program execution.
Step 4: Fixing the Recursion
The problem is that the original numbered tree functions aren't all the same. The first one, tree1(), is different; it just draws a trunk, without any branches.
Fix tree() so that it does something different when levels is 1. levels == 1 is the base case and the rest is the recursive case.
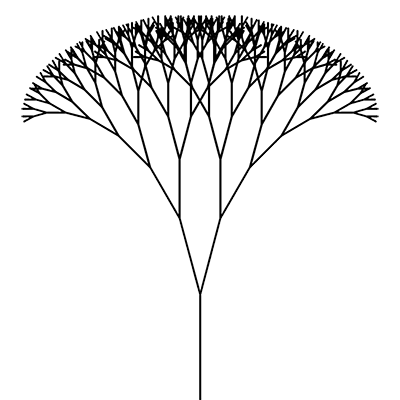
With this change, we can draw trees of any complexity! Here's a level-9 tree:
Step 5: Color Your Tree
Which parts of the tree correspond to which level? To help you visualize, we will color each level of the tree differently. The colors and implementation will be left up to you, but our suggestions include using a color array or an algebraic formula to create a gradient.
When you draw a n-level tree, is the trunk of the tree level 1 or level n? Include your answer in a comment at the beginning of your program.
Step 6: Vary Your Tree [OPTIONAL]
It is recommended that you work on a separate copy of your tree code so that you don't break your previous work! If you do make changes that you are happy with and wish to submit it, make sure you document the additions you made in comments at the top of the program.
Play around with the following changes one at a time to determine their effect on your tree:
- Change the scale factor (was 0.75).
- Change the turn angle of one or both branches (was 15 degrees left/right).
- Change the number of branches (number of recursive calls; was 2).
You can even try adding randomness to the scale factor and turn angle! Important: think carefully about how you can ensure that the coordinate system is returned to same position during a call to tree().
If you would like to, you can try to make a drawing as close to the "realistic" tree at the beginning of this lab as possible!
Submission
- Make sure that your name is included in your file.
- Make sure that most of your lines of code have comments so that someone else can understand it.
- Make sure your response about the level of the trunk is included in your comments.
- Make sure that your tree has at least 5 levels and that every level of your tree is a different color.
- Submit your finished
.pdefile from Step 5 (or Step 6) to the Canvas assignments page. - You should add this program to your portfolio.
Source: https://courses.cs.washington.edu/courses/cse120/17sp/labs/11/tree.html
0 Response to "draw h tree using recursion"
Post a Comment